


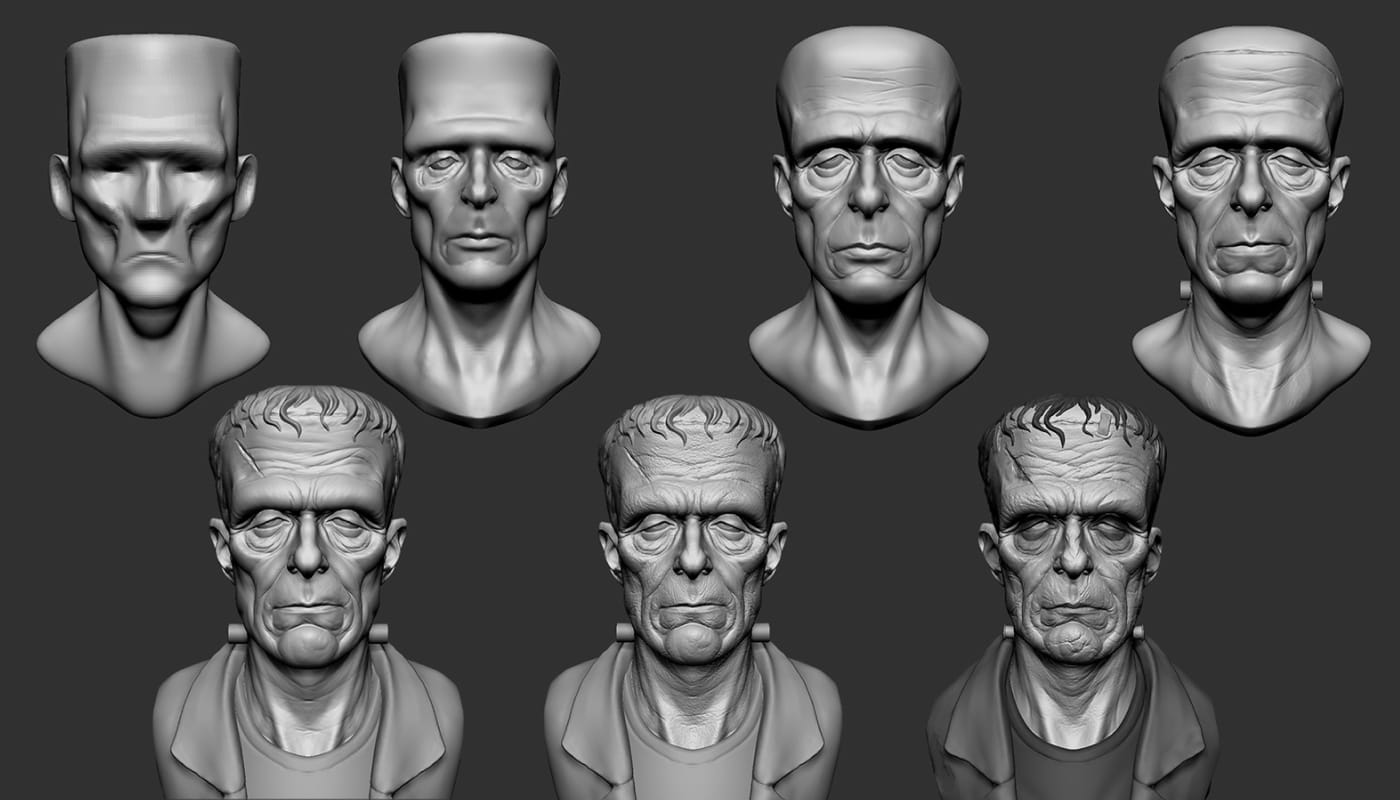
Imagine being able to create a gruesome monster that you saw in your dream, that your caffeine-addled brain conjured up. If I tell you that you can actually conjure that monster in your screen that would even make the Russo brothers jealous.
In this Blog we are reading:
In the ever-evolving world of digital art and design, 3D digital sculpting has emerged as a revolutionary technique that has transformed the way artists, designers, and professionals approach character design, environment creation, and object modeling. This powerful medium allows creators to manipulate digital surfaces with the intuitive feel of traditional sculpting while harnessing the vast potential of computer technology.
3D sculpting has become a key tool across various industries, including gaming, animation, product design, and visual effects (VFX). Its ability to create highly detailed, organic models with unprecedented realism has made it a cornerstone of modern digital content creation. Whether you're crafting lifelike characters for a blockbuster film, designing intricate creatures for a video game, or prototyping innovative products, 3D sculpting offers unparalleled flexibility and creative freedom.
Learning 3D sculpting is not just a valuable skill—it's increasingly becoming a necessity for professionals in creative fields. As the demand for high-quality 3D content continues to grow, mastering digital sculpting techniques can open doors to exciting career opportunities and allow artists to push the boundaries of their creativity.
In this comprehensive guide, we'll read and learn morea about 3D digital sculpting. We'll explore its, techniques, tools, and applications, providing you with a solid foundation to begin your journey into this fascinating realm of digital art.
What is 3D Sculpting?
3D digital sculpting is a method of creating three-dimensional models using specialized software that simulates the process of sculpting physical materials like clay. Unlike traditional 3D modeling techniques that focus on manipulating individual polygons or control points, 3D sculpting allows artists to push, pull, smooth, and shape digital surfaces more intuitively and organically.
At its core, 3D sculpting is about manipulating digital clay. Artists use a variety of virtual tools that mimic real-world sculpting implements, such as brushes, chisels, and smoothing tools. These digital tools interact with the 3D model's surface, allowing for the creation of complex shapes, fine details, and textures that would be challenging or impossible to achieve with conventional 3D modeling techniques.
Key features of 3D sculpting
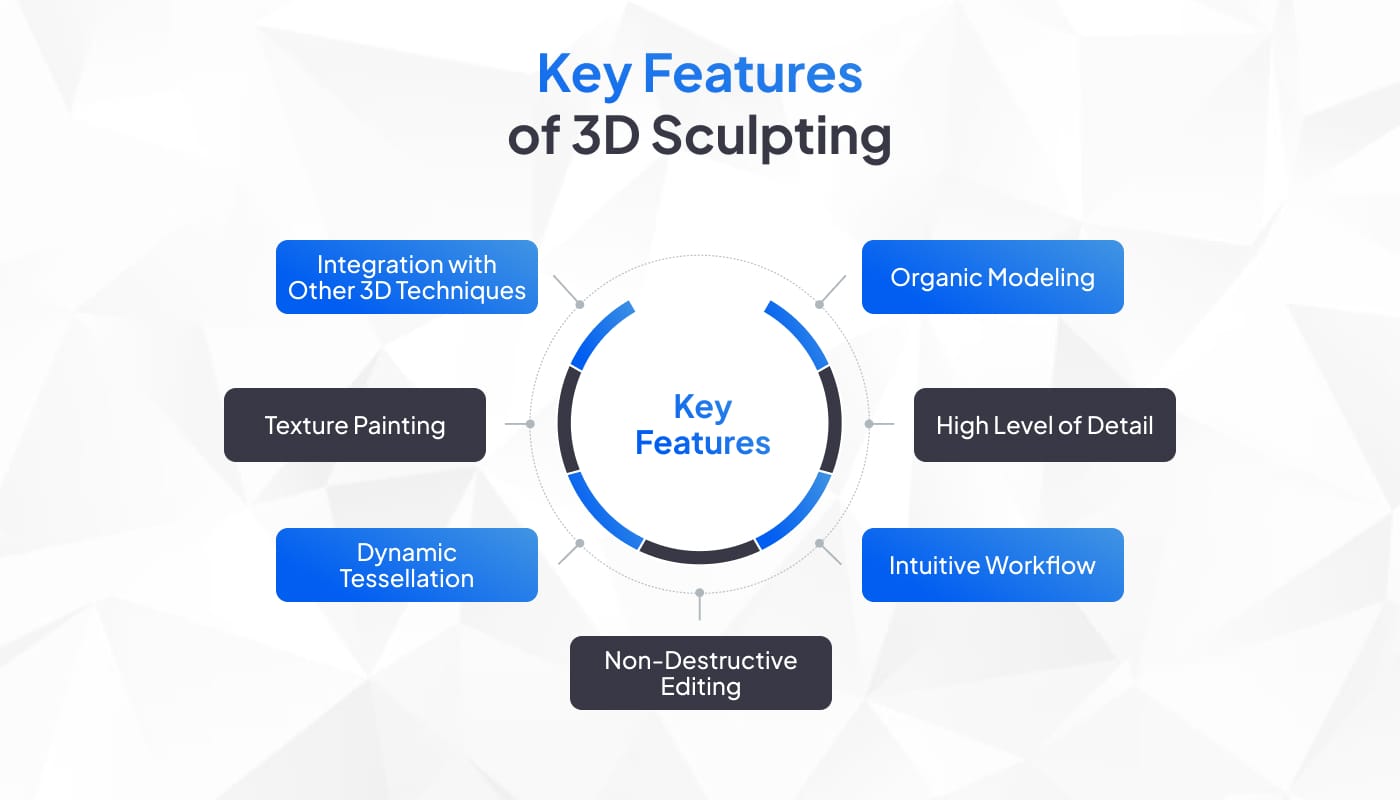
- Organic Modeling: 3D sculpting excels in creating organic shapes and forms, making it ideal for character design, creature creation, and natural environment elements.
- High Level of Detail: Sculptors can create models with millions of polygons, allowing for incredibly fine details and textures.
- Intuitive Workflow: The sculpting process feels more natural and artistic compared to traditional polygonal modeling, as it mimics physical sculpting techniques.
- Non-Destructive Editing: Many sculpting software allows for non-destructive workflows, where artists can experiment freely without permanently altering the base model.
- Dynamic Tessellation: As more detail is added to a model, the software can automatically increase the polygon count in specific areas to accommodate finer details.
- Texture Painting: Many 3D sculpting tools also include the ability to paint directly onto the 3D surface, adding color and texture information to the model.
- Integration with Other 3D Techniques: Sculpted models can be easily integrated into traditional 3D workflows for rigging, animation, and rendering.
3D sculpting differs significantly from other 3D modeling techniques, particularly polygonal modeling. While polygonal modeling involves manipulating individual vertices, edges, and faces to create 3D shapes, sculpting allows for a more freeform approach. This makes sculpting particularly suited for creating complex organic forms and highly detailed surfaces that would be time-consuming or impractical to achieve through traditional modeling methods.
The applications of 3D sculpting are vast and varied. Artists use it to create detailed character models for films and games, design concept art for products and environments and even produce models for 3D printing. The ability to quickly iterate on designs and create highly detailed models has made 3D sculpting an essential tool in many creative pipelines.
As we delve deeper into this guide, we'll explore the various aspects of 3D sculpting in more detail, from its history and evolution to advanced techniques and best practices. Understanding what 3D sculpting is and how it differs from other 3D modeling techniques is the first step in harnessing its powerful capabilities for your own creative projects.
Different Types of 3D Sculpting
3D sculpting encompasses various techniques and approaches, each with its own strengths and ideal use cases. Understanding these different types can help artists choose the most appropriate method for their specific projects. Here are the main types of 3D sculpting:
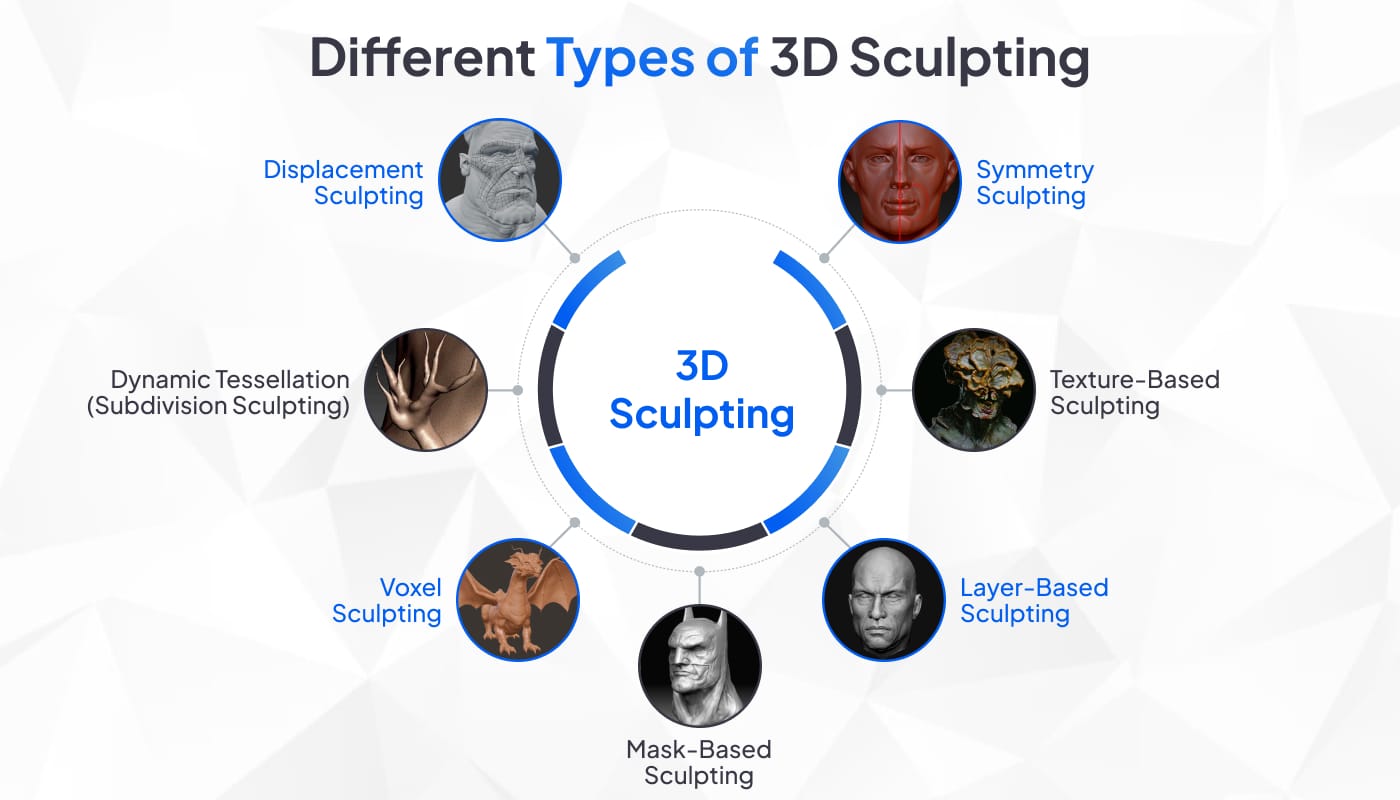
Displacement Sculpting:
Displacement sculpting is one of the most common and versatile types of digital sculpting. It works by displacing the surface of a 3D mesh based on brush strokes or alphas (grayscale images used to define brush patterns).
Key features:
- Allows for adding fine details to a model's surface
- Works well with high-resolution meshes
- Can be combined with other sculpting techniques for complex effects
Ideal for: Adding texture and fine details to characters, creatures, and environmental elements.
Dynamic Tessellation (Subdivision Sculpting):
This technique involves dynamically subdividing the mesh as you sculpt, adding more polygons to areas where more detail is needed.
Key features:
- Allows for starting with a low-poly model and gradually adding detail
- Provides a non-destructive workflow, as the base topology remains intact
- Enables working with extremely high-resolution models without overwhelming system resources
Ideal for: Creating highly detailed models from simple base meshes, character sculpting, and organic modeling.
Voxel Sculpting:
Voxel sculpting uses a volume-based approach, where the model is composed of 3D pixels (voxels) instead of polygonal surfaces.
Key features:
- Allows for easy creation of complex, solid shapes
- Supports boolean operations (union, subtraction, intersection)
- Can create internal structures and cavities easily
Ideal for: Creating complex, solid objects, geological formations, and models intended for 3D printing.
Mask-Based Sculpting:
This technique involves using masks to protect certain areas of the model while sculpting others.
Key features:
- Allows for precise control over which areas are affected by sculpting tools
- Can be combined with other sculpting techniques for complex effects
- Useful for creating hard surface details and sharp edges
Ideal for: Creating mechanical or architectural details, and defining muscle groups in character models.
Layer-Based Sculpting:
Similar to layers in 2D image editing software, layer-based sculpting allows artists to work on different aspects of the model in separate, non-destructive layers.
Key features:
- Provides a non-destructive workflow
- Allows for easy experimentation and iteration
- Enables the separation of different types of details (e.g., primary forms, secondary details, textures)
Ideal for: Complex projects requiring multiple iterations, collaborative work, and creating variations of a base model.
Texture-Based Sculpting:
This technique involves using 2D textures to drive the sculpting process, often in combination with displacement maps.
Key features:
- Allows for the creation of complex, repeating patterns
- It can be used to add fine surface details quickly
- Useful for creating natural textures like bark, scales, or fabric
Ideal for: Adding complex surface details and creating tiled textures for game assets.
Symmetry Sculpting:
While not a distinct sculpting type on its own, symmetry is a crucial feature in most sculpting workflows. It allows artists to work on one side of a model while the software automatically mirrors the changes to the other side.
Key features:
- Speeds up the sculpting process for symmetrical objects
- Can be used with radial symmetry for creating patterns or repetitive structures
- Often combined with other sculpting techniques
Ideal for: Character modeling, creating symmetrical objects or patterns.
Each of these sculpting types has its strengths and ideal use cases. While practicing, 3D artists often combine multiple techniques within a single project to achieve the desired result. Modern sculpting software like ZBrush, Mudbox, and Blender support most, if not all, of these techniques, allowing artists to seamlessly switch between different approaches as needed.
The choice of sculpting technique often depends on the specific requirements of the project, the artist's personal workflow preferences, and the intended use of the final model. As you delve deeper into 3D sculpting, experimenting with these different techniques will help you develop a versatile skill set and find the approaches that work best for your artistic vision.
Sculpting vs. Polygonal Modeling
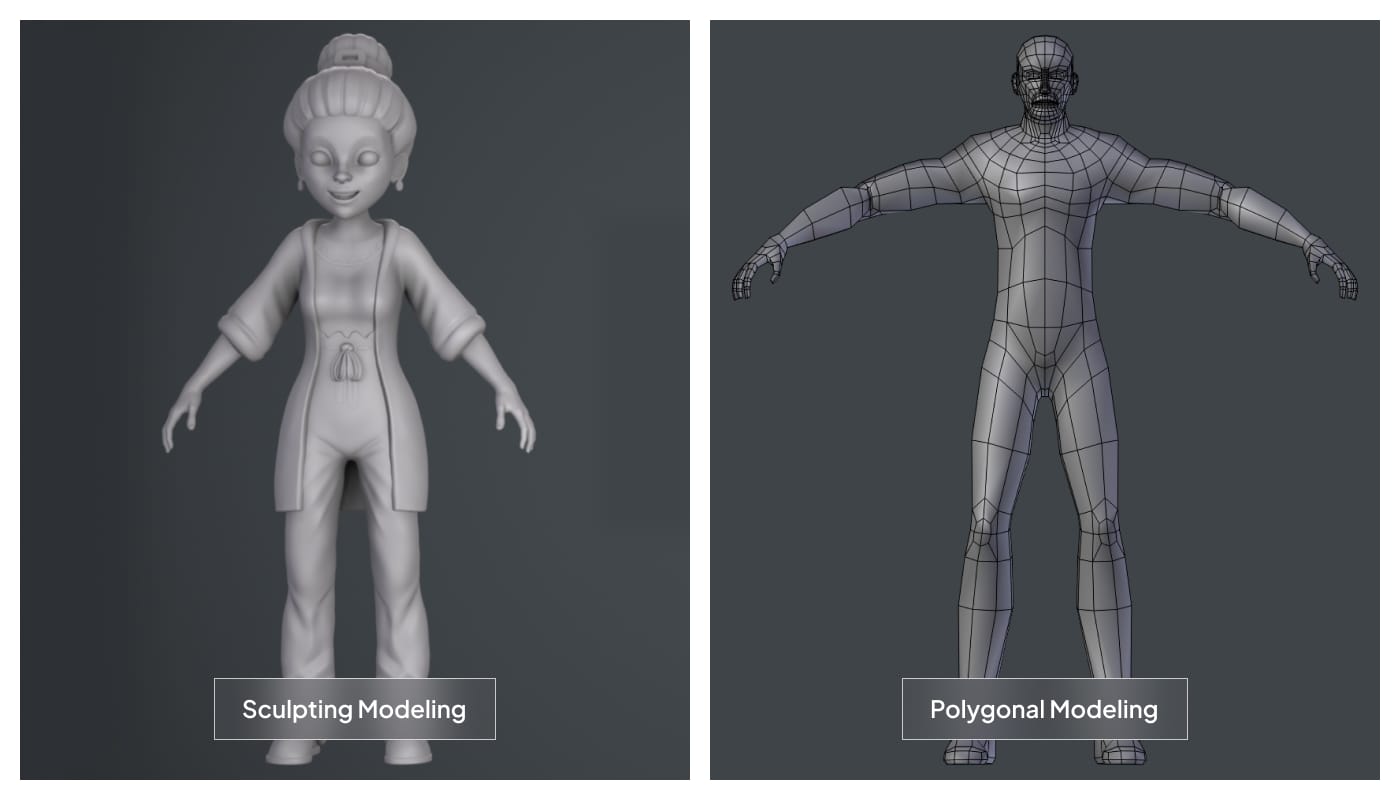
To fully appreciate the power and utility of 3D sculpting, it's essential to understand how it differs from traditional polygonal modeling. Both techniques have their place in the 3D artist's toolkit, but they serve different purposes and excel in different areas. In this section, we will read about the key differences between them, their strengths and limitations, when sculpting can be chosen over polygonal modeling, and when to integrate both approaches.
Key Differences between Sculpting vs Polygon
- Approach to Creating Forms:
- Polygonal Modeling: Involves manipulating individual vertices, edges, and faces to create 3D shapes. It's a precise, mathematical approach to building 3D models.
- Sculpting: Allows for a more intuitive, artistic approach, similar to molding clay. Artists can push, pull, and manipulate surfaces directly.
- Level of Detail:
- Polygonal Modeling: Typically works with lower polygon counts, focusing on efficient topology and clean geometry.
- Sculpting: Can handle extremely high polygon counts, allowing for the creation of intricate details and textures.
- Workflow:
- Polygonal Modeling: Often starts with simple primitive shapes that are then refined and combined.
- Sculpting: Usually begins with a base mesh that is then sculpted and detailed incrementally.
- Learning Curve:
- Polygonal Modeling: Often has a steeper initial learning curve, requiring an understanding of 3D geometry and topology.
- Sculpting: Generally more intuitive for beginners, especially those with traditional art backgrounds.
- Control and Precision:
- Polygonal Modeling: Offers precise control over individual elements of the mesh, ideal for hard-surface modeling.
- Sculpting: Provides more organic control, better suited for creating natural forms and textures.
Strengths of Polygonal Modeling
- Efficiency: Creates clean, low-poly models ideal for real-time applications like games.
- Precise Control: Allows for exact measurements and proportions, crucial in technical or architectural modeling.
- Topology Management: It is easier to create models with optimized topology for animation and deformation.
- UV Mapping: It is often simpler to create clean UV maps for texturing.
- Compatibility: Widely supported across all 3D software and rendering engines.
Strengths of 3D Sculpting
- Organic Forms: Excels at creating natural, organic shapes and characters.
- High Detail: You can create incredibly detailed models with millions of polygons.
- Texturing: Many sculpting tools allow for painting directly on the 3D surface.
- Speed: For certain tasks, sculpting can be much faster than traditional modeling.
- Intuitive Workflow: More closely mimics traditional sculpting techniques.
Limitations of Polygonal Modeling
- Time-Consuming for Organic Shapes: Creating complex organic forms can be tedious and time-consuming.
- Detail Limitations: Adding fine details often requires high polygon counts, which can be inefficient.
- Less Intuitive for Artists: The technical nature can be challenging for those with traditional art backgrounds.
Limitations of 3D Sculpting
- High Polygon Counts: Sculpted models often need to be retopologized for practical use in games or animation.
- Hardware Demands: Working with high-resolution sculpts requires powerful hardware.
- Less Precise: It can be challenging to create exact measurements or perfectly straight edges.
- File Size: High-poly sculpts can result in large file sizes, which can be unwieldy for some workflows.
When to Use Sculpting Over Polygonal Modeling:
- Character Creation: For detailed characters, creatures, or organic models.
- Concept Art: Quickly creating 3D concept models or digital maquettes.
- Fine Surface Details: Adding intricate textures and details to models.
- Environment Assets: Creating natural elements like rocks, trees, or terrain.
- High-Resolution Assets: For film VFX or pre-rendered cinematics where polygon count is less of a concern.
Integrating Both Approaches:
In practice, many 3D artists use a combination of polygonal modeling and sculpting in their workflows. A common approach is to:
- Create a base mesh using polygonal modeling techniques.
- Sculpt details and refine the form using 3D sculpting tools.
- Retopologize the sculpted model to create a clean, animation-friendly mesh.
- Project details from the high-poly sculpt onto the low-poly model using normal maps.
This hybrid approach leverages the strengths of both techniques, allowing for the creation of highly detailed models that are also efficient and practical for use in various applications.
Understanding the strengths and limitations of both sculpting and polygonal modeling is crucial for 3D artists. It allows them to choose the most appropriate technique for each task, leading to more efficient workflows and better final results. As you develop your skills in 3D modeling, becoming proficient in both approaches will greatly expand your capabilities as an artist.
Pros and Cons of 3D Sculpting
3D sculpting has revolutionized the way artists create digital models, but like any technique, it comes with its own set of advantages and challenges. Understanding these can help artists make informed decisions about when and how to use 3D sculpting in their workflows.
Advantages of 3D Sculpting:

Intuitive Creation Process:
3D sculpting mimics traditional clay sculpting, making it more intuitive for artists, especially those with a background in traditional sculpture or painting. 3D Sculpting also lowers the entry barrier for artists transitioning from traditional to digital mediums.
High Level of Detail:
It allows for the creation of incredibly detailed models with millions of: It enables the production of hyper-realistic characters, creatures, and environments.
Organic Modeling:
Excels at creating natural, organic forms that are challenging to achieve with traditional polygonal modeling. Ideal for character design, creature creation, and natural environment elements.
Rapid Prototyping:
Enables quick creation and iteration of 3D concepts. Valuable for conceptual design phases and rapid visualization of ideas.
Non-Destructive Workflows:
Many sculpting tools offer layer-based or non-destructive editing. It allows for easy experimentation and refinement without risking the base model.
Direct Texture Painting:
Many sculpting software programs allow painting directly on the 3D surface, streamlining the texturing process, especially for organic models.
Flexibility:
It can start from a basic shape or import and refine existing 3D models and then versatile techniques that can be integrated into various 3D workflows.
Realistic Material Simulation:
Advanced sculpting software can simulate different materials (clay, wax, etc.) and their properties, and it also enhances the realism and tactile quality of digital sculptures.
Limitations and Challenges of 3D Sculpting:
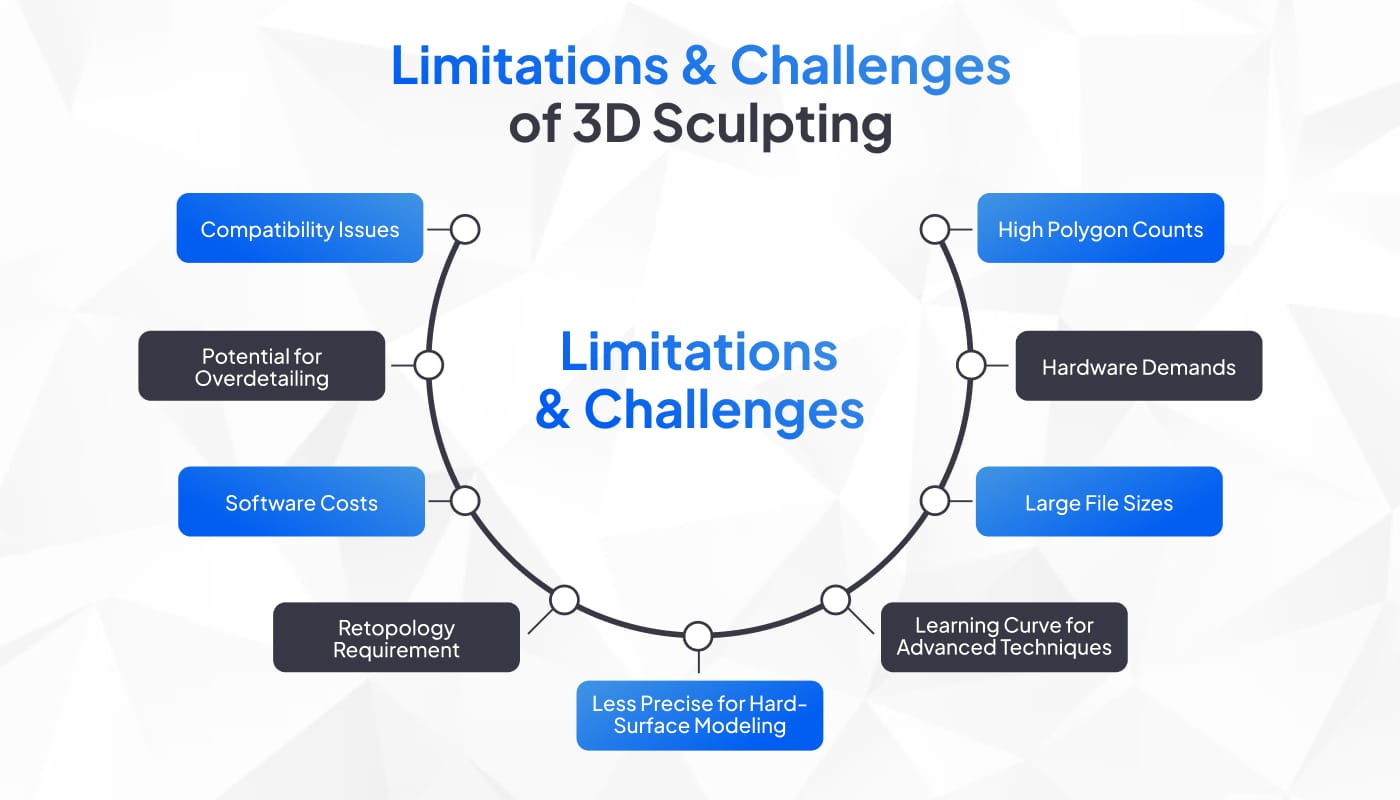
High Polygon Counts:
Sculpted models often have extremely high polygon counts, which can be impractical for real-time applications. Requires additional steps (retopology, optimization) before use in games or real-time renderings.
Hardware Demands:
Working with high-resolution sculpts requires powerful computer hardware. Can be a barrier for artists without access to high-end equipment.
Large File Sizes:
High-poly sculpts result in large file sizes. It can cause storage issues and slow down production pipelines.
Learning Curve for Advanced Techniques:
While basic sculpting is intuitive, mastering advanced techniques and tools can be challenging. Requires significant time investment to fully leverage the power of sculpting software.
Less Precise for Hard-Surface Modeling:
Creating precise, mechanical, or architectural models can be more challenging than sculpting. May require combining sculpting with traditional modeling techniques for certain projects.
Retopology Requirement:
Sculpted models often need to be retopologized for practical use in animation or games. Adds an additional step to the workflow, potentially increasing production time.
Software Costs:
Professional-grade sculpting software can be expensive. May be a barrier for independent artists or small studios.
Potential for Overdetailing:
The ease of adding detail can lead to overworked models. Artists need to develop discipline to know when to stop adding details.
Compatibility Issues:
Extremely high-poly models may not be easily compatible with all 3D software or game engines. May require significant optimization or conversion for use in certain pipelines.
Understanding these pros and cons is crucial for effectively integrating 3D sculpting into a production workflow. While the advantages of sculpting are significant, especially for creating organic and highly detailed models, it's important to be aware of the potential challenges and plan accordingly.
For many projects, the benefits of 3D sculpting far outweigh the limitations, particularly when it comes to creating lifelike characters, creatures, and natural environments. However, artists and studios need to consider factors such as hardware capabilities, project requirements, and integration with existing pipelines when deciding how to incorporate sculpting into their workflows.
As 3D sculpting technology continues to evolve, we can expect to see improvements that address some of these limitations, such as better optimization tools, more efficient handling of high-poly models, and improved integration with other 3D techniques. Staying informed about these developments will help artists make the most of 3D sculpting's potential while mitigating its challenges.
How to Start with 3D Sculpting
Starting your journey into 3D sculpting can be both exciting and daunting. Here's a small step-by-step guide to help you get started, covering the essential skills, knowledge, and first steps you need to take.
Essential Skills and Knowledge:
- Artistic Fundamentals:
- Anatomy: Understanding human and animal anatomy is crucial for character and creature sculpting.
- Form and Shape: Knowledge of how forms interact in 3D space.
- Light and Shadow: Understanding how light affects the perception of form.
- Digital Art Basics:
- Familiarity with digital art tools and concepts.
- Understanding of layers, masks, and blend modes.
- Basic 3D Concepts:
- Understanding of 3D space and navigation.
- Familiarity with terms like vertices, edges, faces, and polygons.
- Computer Skills:
- Comfort with using a computer and installing software.
- Basic file management skills.
Basic Tools and Software:
- Sculpting Software Options:
- ZBrush: Industry standard, powerful but with a steep learning curve.
- Blender: Free, open-source option with robust sculpting tools.
- Mudbox: Autodesk's sculpting software, integrates well with Maya.
- Sculptris: Free, beginner-friendly option (now part of ZBrush).
- Hardware:
- A reasonably powerful computer (8GB+ RAM, dedicated graphics card recommended).
- Graphics tablet (e.g., Wacom) for a more intuitive sculpting experience.
- Reference Material:
- Collection of reference images for anatomy, textures, etc.
- Access to online resources and tutorials.
First Steps for Beginners:
- Choose Your Software:
- Start with a free option like Blender to explore without financial commitment.
- If you're serious about a career in 3D, consider investing in industry-standard software like ZBrush.
- Familiarize Yourself with the Interface:
- Spend time exploring the user interface of your chosen software.
- Learn basic navigation: rotating, panning, and zooming in the 3D space.
- Start with Basic Shapes:
- Begin by sculpting simple forms like spheres, cubes, or cylinders.
- Practice pushing, pulling, and smoothing these basic shapes.
- Experiment with Brushes:
- Explore different brush types and their effects.
- Practice with various brush settings like size, strength, and falloff.
- Learn to Use Symmetry:
- Most sculpting software offers symmetry tools, which are crucial for efficient character creation.
- Practice Sculpting Simple Objects:
- Start with objects like fruits, rocks, or simple cartoon characters.
- Focus on capturing the overall form before adding details.
- Explore Dynamic Topology:
- Learn how to use dynamic tessellation to add detail where needed.
- Study Anatomy:
- Begin with sculpting individual body parts (e.g., eyes, nose, hands).
- Gradually work up to full figures.
- Experiment with Texturing:
- Once comfortable with forms, start exploring basic texturing techniques.
- Follow Tutorials:
- There are numerous free tutorials available online for various sculpting software.
- Start with beginner-friendly projects and gradually tackle more complex ones.
- Join Online Communities:
- Participate in forums and communities dedicated to 3D sculpting.
- Share your work and seek feedback from more experienced artists.
- Practice Regularly:
- Consistency is key to developing your sculpting skills.
- Set aside regular time for practice and experimentation.
Tips for a Smooth Start:
- Don't Rush to Details: Focus on getting the overall form right before adding fine details.
- Use References: Always work with reference images, especially when starting out.
- Start Simple: Begin with projects that match your skill level and gradually increase complexity.
- Embrace Mistakes: Don't be afraid to make mistakes; they're a crucial part of the learning process.
- Explore Different Styles: Try both realistic and stylized sculpting to find your preferred style.
- Learn Keyboard Shortcuts: Familiarize yourself with keyboard shortcuts to speed up your workflow.
- Backup Your Work: Regularly save and create backups of your projects.
- Stay Inspired: Follow other 3D artists on social media for inspiration and motivation.
- Be Patient: Developing proficiency in 3D sculpting takes time. Enjoy the learning process.
Starting your journey in 3D sculpting can be challenging, but with patience, practice, and the right resources, you can develop this valuable skill. Remember that every expert was once a beginner, and consistent effort is key to improvement. As you progress, you'll find that 3D sculpting opens up a world of creative possibilities, allowing you to bring your imagination to life in ways that were once impossible. Embrace the learning process, stay curious, and don't hesitate to experiment with different techniques and styles as you develop your unique artistic voice in the world of 3D sculpting.
Critical Components of 3D Sculpting
Understanding the critical components of 3D sculpting is essential for mastering this art form. These components form the foundation of the sculpting process and are crucial for creating detailed, high-quality 3D models. Let's explore each of these key elements in depth.
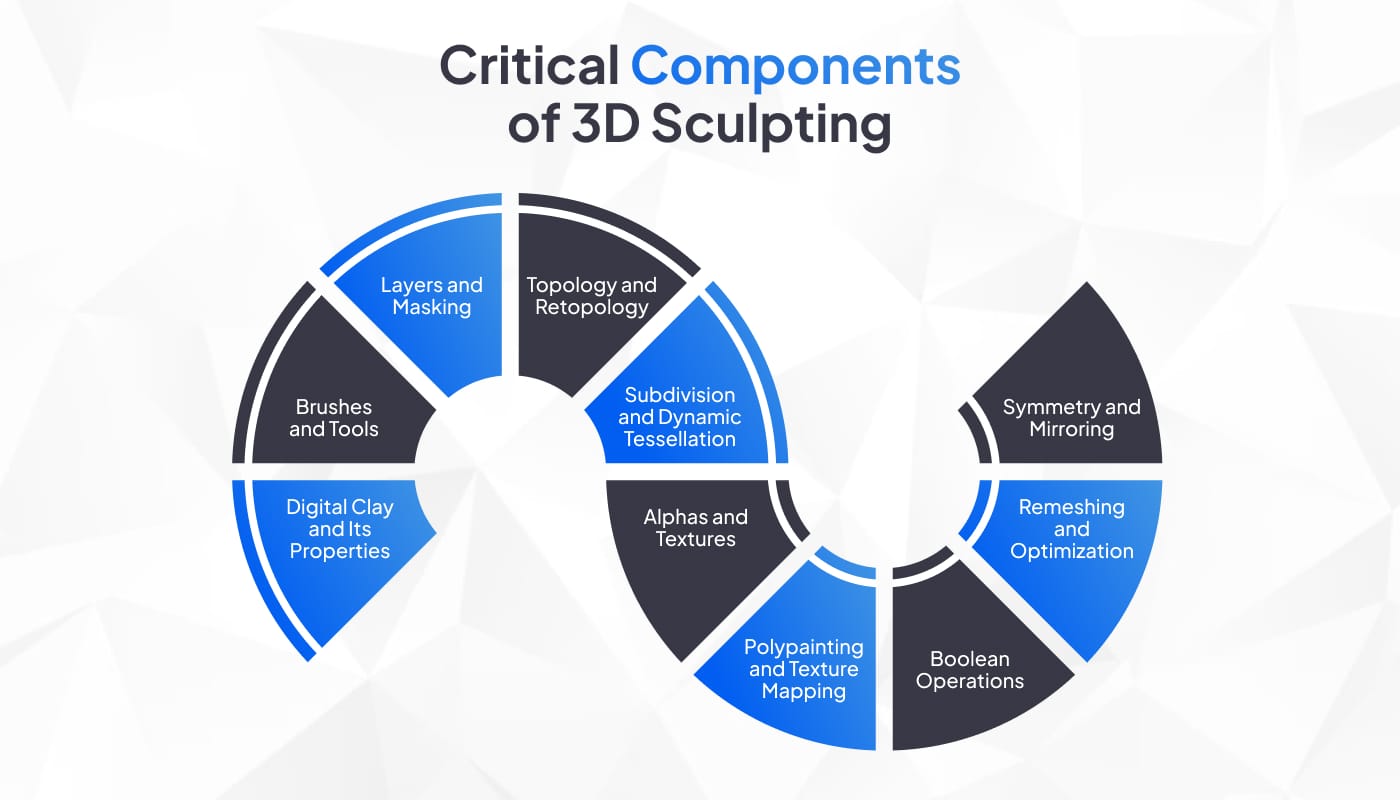
1. Digital Clay and Its Properties
Digital clay is the virtual material that 3D sculptors manipulate to create their models. Understanding its properties is crucial for effective sculpting.
Key aspects:
- Malleability: Digital clay can be pushed, pulled, smoothed, and shaped.
- Resolution: The density of polygons or voxels that make up the digital clay.
- Behavior: How the clay responds to different tools and techniques.
Importance:
- Simulates the feel of working with real clay, making the process intuitive for traditional sculptors.
- Allows for organic modeling and smooth forms.
- The resolution of the digital clay affects the level of detail possible in the sculpture.
2. Brushes and Tools
Brushes and tools are the primary means of interacting with and shaping digital clay.
Types of brushes:
- Standard brushes: For general sculpting (e.g., Move, Clay, Smooth)
- Alpha brushes: Use grayscale images to create complex surface patterns
- Masking brushes: For protecting areas from being affected by sculpting
- Specialty brushes: For specific effects like hair, fabric, or hard surface details
Key tool features:
- Brush size and strength
- Falloff and flow control
- Pressure sensitivity (when using a graphics tablet)
Importance:
- Different brushes allow for various sculpting techniques and effects.
- Understanding brush properties is crucial for achieving desired results.
- Mastering brush control is key to creating detailed and precise sculptures.
3. Layers and Masking
Layers and masking provide non-destructive ways to work on different aspects of a model.
Layer system:
- Similar to 2D image editing software
- Allows for separate sculpting passes that can be adjusted independently
- Useful for experimenting with different details or variations
Masking:
- Protects specific areas of the model from being affected by sculpting
- Can be used to isolate areas for detailed work
- Enables creation of hard edges and precise transitions
Importance:
- Provides flexibility in the sculpting process
- Allows for easy experimentation and iteration
- Crucial for managing complex sculptures with multiple elements
4. Topology and Retopology
Topology refers to the arrangement of polygons that make up a 3D model. Retopology is the process of recreating a more efficient polygon structure for a sculpted model.
Key aspects of topology:
- Edge flow: The direction and arrangement of polygon edges
- Polygon density: The concentration of polygons in different areas of the model
- Quad-based vs. triangulated meshes
Retopology:
- Often necessary to optimize high-poly sculpts for animation or real-time rendering
- Involves creating a new, more efficient mesh that follows the contours of the sculpted model
- Can be done manually or with automated tools
Importance:
- Good topology is crucial for animation, texturing, and efficient rendering
- Retopology bridges the gap between high-detail sculpts and practical, usable 3D models
- Understanding topology helps in creating models that are both detailed and functional
5. Subdivision and Dynamic Tessellation
Subdivision and dynamic tessellation are techniques that allow sculptors to add detail to their models progressively.
Subdivision:
- Increases the polygon count of a model by splitting existing polygons
- Allows for smooth surfaces and the addition of finer details
- Can be applied globally or to specific areas of a model
Dynamic Tessellation:
- Automatically adds polygons to areas being sculpted
- Allows starting with a low-poly model and adding detail where needed
- Helps manage system resources by concentrating detail where it's most needed
Importance:
- Enables the creation of highly detailed models without starting from an extremely dense mesh
- Allows for a more efficient workflow, starting broad and refining progressively
- Crucial for managing performance when working on complex sculptures
6. Alphas and Textures
Alphas and textures are grayscale or color images used to add complex surface details to sculptures.
Alphas:
- Grayscale images used to define brush patterns or displacement
- Can create complex surface details quickly (e.g., skin pores, scales, fabric patterns)
Textures:
- Color or grayscale images applied to the surface of a model
- Can add color, bump, or displacement information
Importance:
- Speeds up the process of adding intricate surface details
- Allows for consistent application of repeated patterns
- Essential for creating realistic or highly detailed surfaces
7. Polypainting and Texture Mapping
Polypainting allows artists to paint directly onto the 3D model, while texture mapping involves applying 2D images to the 3D surface.
Polypainting:
- Paints color information directly on the vertices of the model
- Allows for high-resolution color detail without a separate UV map
- Useful for concept work and high-resolution models
Texture Mapping:
- Involves creating UV maps to define how 2D textures wrap around the 3D model
- Allows for more control and optimization of texture resolution
- Essential for models intended for real-time applications like games
Importance:
- Adds color and surface detail to models
- Crucial for creating realistic or stylized finishes
- Integrates the sculpting and texturing processes
8. Boolean Operations
Boolean operations allow for complex shape creation by combining or subtracting 3D objects.
Types of boolean operations:
- Union: Combines two or more objects
- Subtraction: Removes one object from another
- Intersection: Creates an object from the overlapping parts of two objects
Importance:
- Useful for creating complex shapes quickly
- Essential for hard surface modeling within a sculpting workflow
- Allows for non-destructive shape experimentation
9. Remeshing and Optimization
Remeshing involves regenerating the topology of a model, while optimization focuses on reducing polygon count while maintaining detail.
Remeshing:
- Redistributes polygons more evenly across the model
- Useful after heavy sculpting or boolean operations
Optimization:
- Reduces polygon count for better performance
- Includes techniques like decimation and LOD (Level of Detail) creation
Importance:
- Crucial for preparing high-resolution sculpts for practical use
- Maintains model quality while improving performance
- Essential for game asset creation and real-time rendering
10. Symmetry and Mirroring
Symmetry tools allow sculptors to work on one side of a model while automatically mirroring changes to the other side.
Features:
- Bilateral symmetry (left-right mirroring)
- Radial symmetry (useful for creating patterns or circular objects)
- Ability to break symmetry for asymmetrical details
Importance:
- Greatly speeds up the sculpting process for symmetrical objects
- Ensures consistency across symmetrical parts of a model
- Can be selectively used or broken for natural asymmetry
Understanding and mastering these critical components of 3D sculpting is essential for creating high-quality, detailed 3D models efficiently. Each of these elements plays a crucial role in the sculpting process, from the initial shaping of the model to the final detailing and preparation for use in various applications.
As you progress in your 3D sculpting journey, you'll find that these components often work in concert. For example, you might use dynamic tessellation to add detail to a specific area, apply an alpha texture with a specialized brush, use masking to protect certain parts, and then use polypainting to add color - all within the same sculpting session.
The interplay between these components is what gives 3D sculpting its power and flexibility. By becoming proficient in each of these areas, you'll be able to bring your creative visions to life with greater ease and precision. Remember that mastering these components takes time and practice, so don't be discouraged if it feels overwhelming at first. With consistent effort and experimentation, you'll gradually build the skills needed to leverage these components effectively in your 3D sculpting projects.
Advanced 3D Sculpting Techniques
As you progress in your 3D sculpting journey, you'll encounter more advanced techniques that can take your work to the next level. These techniques allow for greater detail, more efficient workflows, and the ability to create complex, professional-quality models. Let's explore some of these advanced techniques:
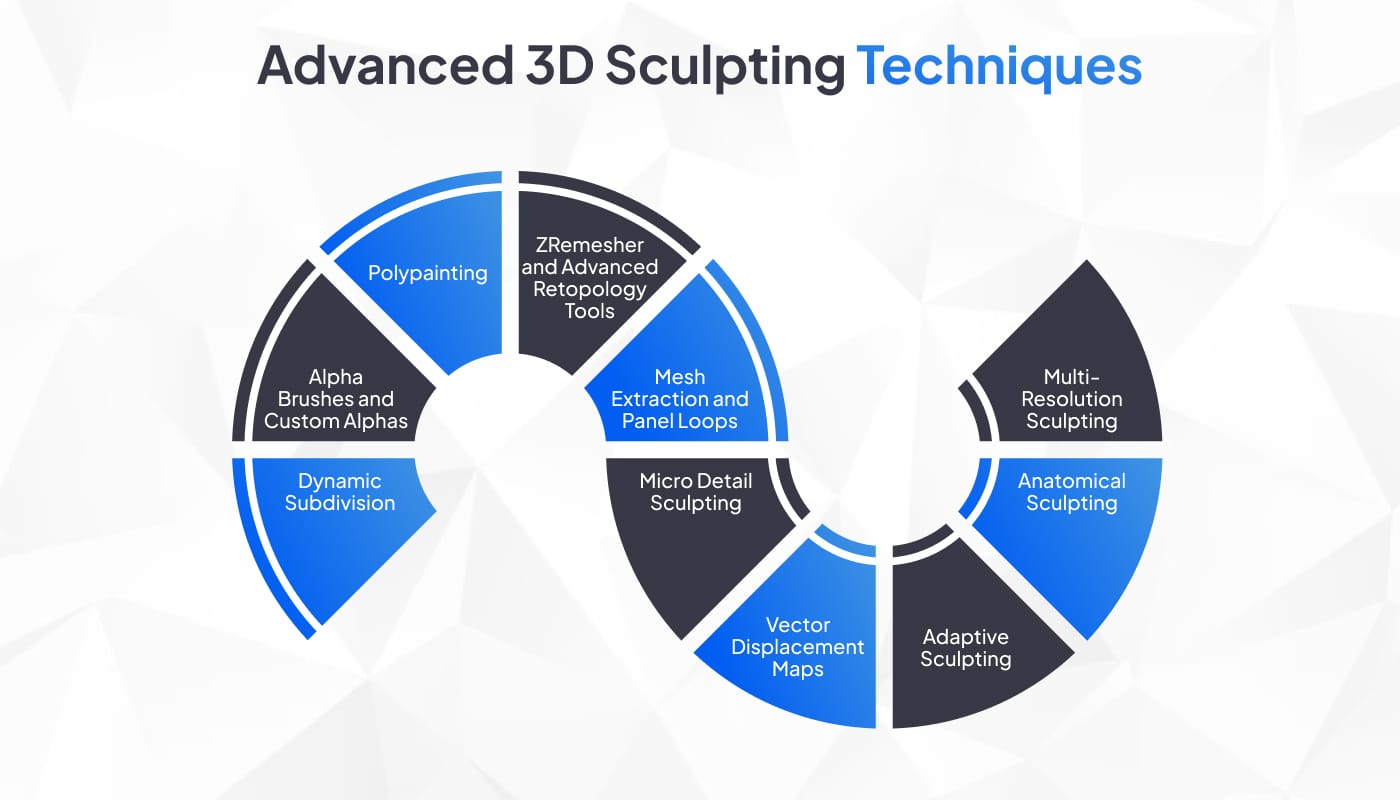
1. Dynamic Subdivision
Dynamic subdivision is a technique that allows you to add detail to your model progressively as you sculpt, without permanently increasing the polygon count of your base mesh.
Key aspects:
- Allows starting with a low-poly model and adding detail where needed
- Preserves a lightweight base mesh for easier manipulation
- Can be adjusted on the fly to balance detail and performance
Applications:
- Creating highly detailed models while maintaining a manageable file size
- Focusing detail where it's most important visually
- Efficient sculpting workflow, especially for character and creature design
2. Alpha Brushes and Custom Alphas
Alpha brushes use grayscale images (alphas) to define brush patterns, allowing for the quick addition of complex surface details.
Techniques:
- Creating custom alphas for unique textures and patterns
- Combining multiple alphas for complex effects
- Using alphas for both additive and subtractive sculpting
Applications:
- Quickly adding skin textures, scales, or fabric patterns
- Creating complex organic textures like tree bark or rock surfaces
- Designing unique surface patterns for concept art or stylized models
3. Polypainting
Polypainting allows you to paint color directly onto your high-resolution sculpt without the need for UV mapping.
Key features:
- Paint directly on the 3D surface at the resolution of your sculpt
- No need for initial UV mapping
- Can be converted to texture maps later in the process
Applications:
- Rapid prototyping and concept development
- Adding color details to high-resolution models for rendering
- Creating texture maps for lower-resolution game assets
4. ZRemesher and Advanced Retopology Tools
ZRemesher (in ZBrush) and similar tools in other software offer advanced automatic retopology solutions.
Techniques:
- Using guide curves to control edge flow
- Adjusting polygon density in different areas of the model
- Combining automatic retopology with manual adjustments
Applications:
- Quickly creating game-ready assets from high-poly sculpts
- Preparing models for animation
- Optimizing models for real-time rendering
5. Mesh Extraction and Panel Loops
These techniques allow for the creation of hard surface details and mechanical components within an organic sculpting workflow.
Mesh Extraction:
- Creating new geometry from masked areas of a sculpt
- Useful for adding armor, clothing, or mechanical parts to characters
Panel Loops:
- Creating clean, hard edges and panels on surfaces
- Essential for sci-fi and mechanical designs
Applications:
- Designing characters with both organic and mechanical elements
- Creating hard surface details in a sculpting environment
- Conceptualizing complex mechanical designs
6. Micro Detail Sculpting
This involves adding extremely fine details to your models, often at a level that's not immediately visible but adds to the overall realism.
Techniques:
- Using very high subdivision levels
- Applying noise and surface breakup
- Layering multiple levels of detail
Applications:
- Creating ultra-realistic character models for close-up renders
- Adding subtle imperfections to surfaces for greater realism
- Enhancing the perceived quality of models in high-resolution outputs
7. Vector Displacement Maps
Vector displacement maps allow for the storage and application of complex 3D details as a 2D texture.
Key features:
- Stores directional displacement information
- Allows for the application of complex 3D forms onto simpler base meshes
- Can dramatically reduce polygon counts while preserving detail
Applications:
- Creating complex environmental assets like rocks or trees
- Applying detailed sculpts to lower-resolution base meshes
- Efficient storage and application of reusable 3D details
8. Adaptive Sculpting
Adaptive sculpting involves techniques that adjust to the contours and details of your model as you work.
Techniques:
- Brushes that conform to surface curvature
- Tools that automatically adjust to the scale of existing details
- Sculpting methods that preserve or enhance existing surface characteristics
Applications:
- Maintaining consistent detail levels across varied surfaces
- Enhancing natural-looking forms and textures
- Efficiently adding details that complement existing structures
9. Anatomical Sculpting
Advanced anatomical sculpting goes beyond basic forms to include subtle details that bring characters to life.
Techniques:
- Layering muscle, fat, and skin
- Incorporating subtle asymmetries for realism
- Adding secondary and tertiary forms for lifelike quality
Applications:
- Creating highly realistic character models
- Designing creatures with believable anatomy
- Enhancing the sense of life and movement in static sculptures
10. Multi-Resolution Sculpting
This technique involves working on a model at multiple levels of subdivision, allowing for both broad and fine adjustments.
Key aspects:
- Ability to switch between different levels of detail
- Maintaining the relationship between large forms and fine details
- Non-destructive workflow that preserves all levels of detail
Applications:
- Creating models with cohesive forms from large shapes to fine details
- Efficiently managing complex sculpts
- Allowing for late-stage adjustments to major forms without losing detail
Mastering these advanced techniques can significantly enhance your 3D sculpting capabilities. They allow for greater control, more efficient workflows, and the ability to create highly detailed and realistic models. However, it's important to remember that these techniques build upon a solid foundation of basic sculpting skills
As you explore these advanced techniques, consider the following tips:
1. Practice Regularly: Consistent practice is key to mastering these advanced techniques.
2. Study Reference: Real-world reference is crucial for understanding complex forms and textures.
3. Experiment: Don't be afraid to combine techniques or use them in unconventional ways.
4. Optimize Your Workflow: Learn to balance detail with performance to maintain an efficient sculpting process.
5. Stay Updated: 3D sculpting software is constantly evolving. Stay informed about new tools and techniques.
6. Share and Seek Feedback: Engaging with the 3D sculpting community can provide valuable insights and motivation.
Remember, the goal of these advanced techniques is not just to add more detail but to enhance the overall quality and impact of your 3D sculptures. With practice and experimentation, you'll develop a nuanced understanding of when and how to apply these techniques to bring your creative visions to life.
12 Common Challenges in 3D Sculpting
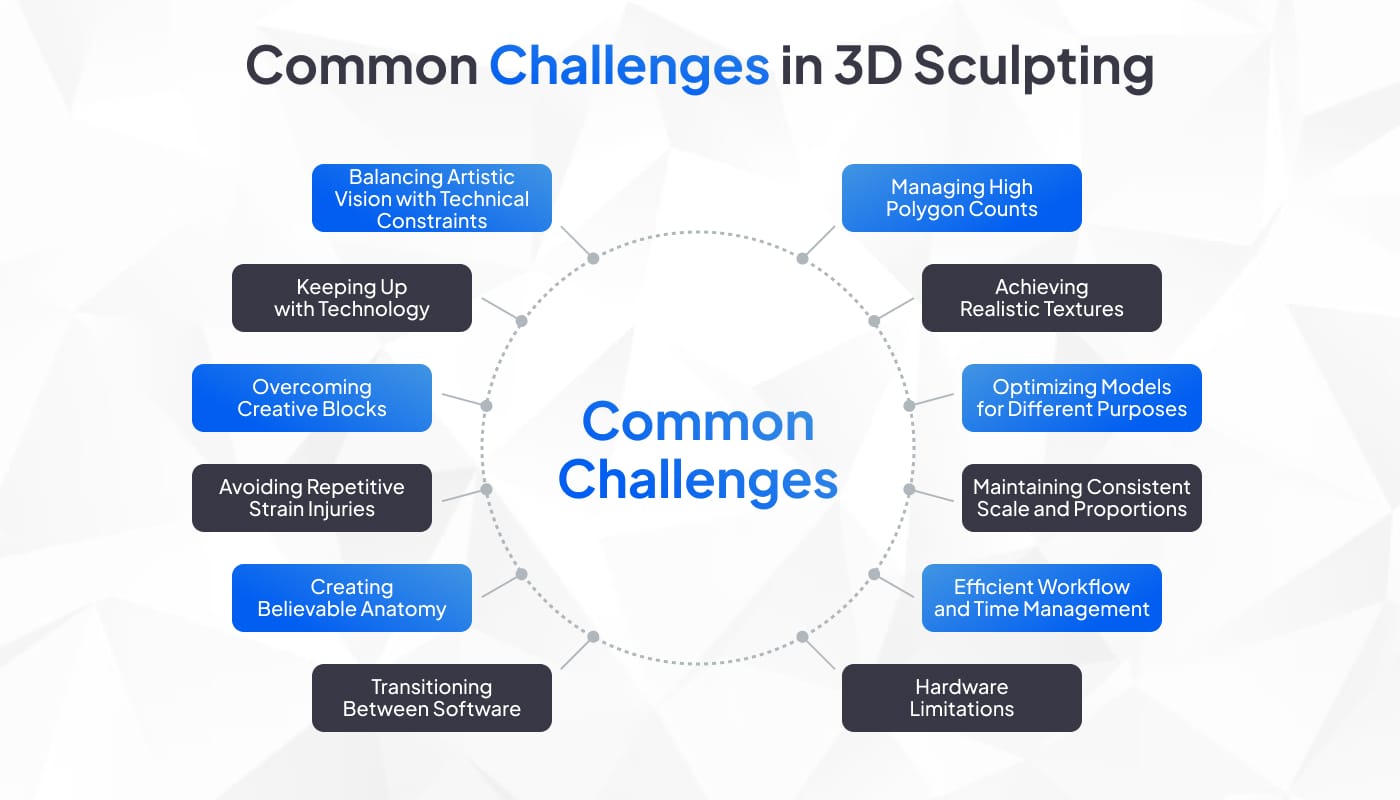
As with any complex artistic and technical discipline, 3D sculpting comes with its own set of challenges. Understanding these common hurdles can help you prepare for them and develop strategies to overcome them. Here are some of the most frequent challenges faced by 3D sculptors:
1. Managing High Polygon Counts
Challenge:
- High-detail sculpts can result in models with millions of polygons
- These dense models can strain computer resources and slow down the sculpting process
Solutions:
- Use dynamic tessellation to add detail only where needed
- Work with subdivision levels, sculpting major forms at lower levels
- Utilize mesh extraction techniques for separate high-detail areas
- Regularly optimize and decimate meshes
- Invest in hardware upgrades if consistently working with very high-poly models
2. Achieving Realistic Textures
Challenge:
- Creating convincing skin, fabric, or organic textures can be difficult
- Balancing between sculpted and painted details for realism
Solutions:
- Study and use reference images extensively
- Utilize alpha brushes and custom textures
- Combine sculptural and painted techniques
- Practice layering multiple levels of detail, from large forms to fine wrinkles
- Experiment with procedural texturing techniques
3. Optimizing Models for Different Purposes
Challenge:
- Sculpted models often need to be optimized for various uses (e.g., real-time rendering, 3D printing, high-res rendering)
- Balancing detail preservation with polygon reduction
Solutions:
- Plan the model's purpose from the beginning
- Master retopology techniques for creating efficient low-poly versions
- Learn to bake details from high-poly to low-poly models effectively
- Understand the specific requirements of different mediums (e.g., game engines, 3D printers)
4. Maintaining Consistent Scale and Proportions
Challenge:
- Keeping proportions accurate, especially when working on different parts of a model separately
- Ensuring consistency when creating multiple models for a scene
Solutions:
- Regularly use reference objects for scale
- Utilize measurement tools within the sculpting software
- Work with a base mesh or mannequin for consistent proportions
- Frequently view the model from different angles and distances
5. Efficient Workflow and Time Management
Challenge:
- Sculpting can be time-consuming, especially for highly detailed models
- Balancing time spent on different stages of the sculpting process
Solutions:
- Develop a structured workflow and stick to it
- Set clear milestones and deadlines for different stages
- Use time-saving features like symmetry and alphas effectively
- Know when to stop adding details and move to the next stage
6. Hardware Limitations
Challenge:
- Sculpting software can be resource-intensive
- Lag and slow performance can hinder the creative process
Solutions:
- Optimize your sculpting settings for your hardware
- Use techniques like working with lower subdivision levels when possible
- Regularly clear undo history and optimize the scene
- Consider hardware upgrades, particularly RAM and GPU
7. Transitioning Between Software
Challenge:
- Moving between sculpting, texturing, and rendering software can be complex
- Maintaining model integrity and detail through different software
Solutions:
- Understand file formats and export settings
- Learn efficient pipelines for your specific software combination
- Use standardized naming conventions and file organization
- Consider using software suites designed to work together
8. Creating Believable Anatomy
Challenge:
- Accurately representing human or animal anatomy, especially in dynamic poses
- Balancing anatomical accuracy with artistic style
Solutions:
- Study anatomy extensively, using books, videos, and life drawing
- Use anatomical reference models in your sculpting software
- Practice sculpting individual body parts before full figures
- Understand the underlying structures (skeleton, muscles) before adding surface details
9. Avoiding Repetitive Strain Injuries
Challenge:
- Long hours of detailed work can lead to physical strain, particularly in wrists and back
Solutions:
- Set up an ergonomic workspace
- Take regular breaks and do stretching exercises
- Alternate between different types of tasks
- Use shortcut keys and optimize your workspace to reduce repetitive movements
10. Overcoming Creative Blocks
Challenge:
- Facing artistic burnout or lack of inspiration
- Struggling to start or finish projects
Solutions:
- Build a collection of inspirational art and references
- Participate in online challenges or community projects
- Take breaks to work on different types of projects or techniques
- Seek feedback and collaboration with other artists
11. Keeping Up with Technology
Challenge:
- 3D sculpting software and techniques evolve rapidly
- Balancing learning new tools with improving core skills
Solutions:
- Allocate time for learning and experimenting with new features and software
- Follow industry news and software updates
- Participate in online communities and forums
- Attend workshops, webinars, or conferences when possible
12. Balancing Artistic Vision with Technical Constraints
Challenge:
- Reconciling creative ideas with technical limitations or project requirements
- Adapting artistic style to meet client or project needs
Solutions:
- Clearly define project requirements and constraints before starting
- Develop a strong understanding of technical limitations and how to work within them
- Practice creating style guides and adapting your work to different artistic directions
- Communicate clearly with clients or team members about artistic choices and technical trade-offs
Overcoming these challenges is part of the journey of becoming a proficient 3D sculptor. Each challenge presents an opportunity to learn and grow as an artist. Remember that even experienced professionals face these issues, and developing strategies to address them is an ongoing process.
As you encounter these challenges in your own work, don't be discouraged. Instead, view them as opportunities to problem-solve and improve your skills. Engage with the 3D sculpting community, share your experiences, and learn from others who have faced similar obstacles. With persistence, practice, and a willingness to learn, you can overcome these common challenges and continue to grow as a 3D sculptor.
25 Tips for 3D Sculpting Beginners
Starting your journey in 3D sculpting can be both exciting and daunting. Here are some valuable tips to help beginners get off to a strong start and develop their skills effectively:
- Start with Basic Shapes:
- It begins by mastering simple forms like spheres, cubes, and cylinders
- Practice manipulating these basic shapes before moving to complex models
- Understand how different forms interact and combine to create more complex structures
- Focus on Anatomy:
- If you're interested in character or creature sculpting, start with studying anatomy
- Begin by sculpting a skull, as it forms the foundation for facial features
- Gradually move to muscular structures and then skin and surface details
- Use reference images and anatomical models extensively
- Use Reference Images:
- Always work with reference images, especially when starting out
- Gather multiple references for different angles and lighting conditions
- Create mood boards or reference sheets for complex projects
- Master the Primary Forms First:
- Focus on getting the overall shape and proportions right before adding details
- Work on large forms and silhouettes before moving to finer details
- Use the "squint test" to check if the basic forms read well
- Utilize Symmetry:
- Take advantage of symmetry tools for efficiency, especially in the early stages
- Learn when to break symmetry for more natural-looking models
- Experiment with Different Brushes:
- Familiarize yourself with various brush types and their effects
- Create custom brushes for specific textures or effects
- Practice using both additive and subtractive brushes
- Work in Layers:
- Use layers to organize different elements of your sculpt
- This allows for easier experimentation and non-destructive workflows
- Learn Keyboard Shortcuts:
- Memorize essential shortcuts to speed up your workflow
- Customize shortcuts to suit your working style
- Start with a Lower Subdivision Level:
- Begin sculpting at a lower subdivision level and gradually increase as you add more detail
- This helps manage computer resources and keeps your workflow smooth
- Practice Regularly:
- Set aside time for regular practice, even if it's just for short sessions
- Consistency is key in developing your skills
- Join Online Communities:
- Participate in 3D sculpting forums and communities
- Share your work and ask for constructive feedback
- Learn from other artists' experiences and techniques
- Follow Tutorials:
- Take advantage of free online tutorials and courses
- Start with beginner-friendly projects and gradually tackle more complex ones
- Try to understand the principles behind techniques, not just the steps
- Experiment with Different Styles:
- Don't limit yourself to one style; try both realistic and stylized sculpting
- Experimenting helps you find your unique artistic voice
- Understand Your Software:
- Take time to learn the interface and tools of your chosen sculpting software
- Explore different features and understand their applications
- Practice Observation Skills:
- Develop the habit of observing forms, textures, and light in the real world
- Try sculpting everyday objects to improve your understanding of forms
- Don't Neglect 2D Skills:
- Practice traditional drawing to improve your understanding of form, proportion, and composition
- Sketch your ideas before sculpting to plan your approach
- Learn Basic Topology:
- Understand the principles of good topology, even if you're focusing on high-poly sculpting
- This knowledge will be valuable when you start creating game-ready or animation-ready models
- Start Simple and Scale Up:
- Begin with simple projects and gradually increase complexity
- Completing smaller projects gives you a sense of accomplishment and builds confidence
- Embrace Mistakes:
- Don't be afraid to make mistakes; they are a crucial part of the learning process
- Analyze what went wrong and how you can improve next time
- Focus on One Thing at a Time:
- When learning a new technique, focus on mastering that specific skill
- Trying to learn everything at once can be overwhelming
- Understand Light and Form:
- Study how light interacts with different surfaces and forms
- This knowledge is crucial for creating convincing 3D sculptures
- Take Care of Your Health:
- Set up an ergonomic workspace to prevent strain
- Take regular breaks to rest your eyes and stretch
- Document Your Progress:
- Keep a record of your work to track your improvement over time
- This can be motivating and helps you identify areas for further development
- Learn from Traditional Sculpting:
- If possible, try some traditional clay sculpting
- Understanding physical sculpting can enhance your digital skills
- Be Patient with Yourself:
- Remember that developing sculpting skills takes time
- Celebrate small victories and improvements along the way
Remember, every expert was once a beginner. The key to improving in 3D sculpting is consistent practice, a willingness to learn from mistakes, and staying curious about new techniques and approaches. Don't get discouraged if your early attempts don't meet your expectations – with time and practice, you'll see significant improvements in your work.
As you progress, you'll develop your own workflow and style. Stay open to feedback, continue learning, and most importantly, enjoy the creative process of bringing your ideas to life through 3D sculpting.
Where is 3D Sculpting Used?
3D sculpting has become an integral part of various industries, revolutionizing the way we create, design, and visualize objects in three-dimensional space. Let's explore some of the key areas where 3D sculpting is making a significant impact:

Film and Animation Industry
In the world of cinema and animation, 3D sculpting plays a crucial role in bringing fantastical characters and creatures to life. Artists use digital sculpting tools to create highly detailed models that can be animated or used as references for practical effects. This technology has been instrumental in creating iconic characters in blockbuster movies and animated features.
Video Game Development
The gaming industry heavily relies on 3D sculpting to create immersive virtual worlds. Game artists use sculpting techniques to design characters, environments, and props with intricate details. These high-poly models are then optimized for real-time rendering in game engines, allowing players to experience richly detailed and visually stunning game worlds.
Product Design and Prototyping
3D sculpting has transformed the product design process. Designers can quickly iterate on concepts, creating detailed 3D models that can be easily modified and refined. This approach allows for rapid prototyping and helps in visualizing the final product before moving to physical production, saving time and resources.
3D Printing and Manufacturing
The rise of 3D printing technology has made 3D sculpting an essential skill in manufacturing. Sculptors can create complex, organic shapes that can be directly 3D printed, opening up new possibilities in custom manufacturing, rapid prototyping, and even personalized consumer products.
Medical and Scientific Visualization
In the medical field, 3D sculpting is used to create accurate anatomical models for education, surgical planning, and patient communication. Scientists also use 3D sculpting to visualize complex molecular structures or geological formations, making abstract concepts more tangible and easier to understand.
Best Practices in 3D Sculpting
To excel in 3D sculpting, consider the following best practices:
Maintaining a Clean Topology
A clean topology is crucial for creating high-quality 3D models. This involves:
- Creating even quad-based geometry
- Avoiding triangles and n-gons where possible
- Ensuring proper edge flow that follows the form of the model
Efficient Use of Subdivisions
Proper use of subdivisions can greatly enhance your workflow:
- Start with a low-poly base mesh and gradually increase detail
- Use dynamic subdivision to work at different levels of detail
- Be mindful of performance implications when using high subdivision levels
Proper File Management and Organization
Staying organized is key to efficient 3D sculpting:
- Use clear naming conventions for files and layers
- Keep your project files well-structured
- Regularly save incremental versions of your work
- Utilize cloud storage or version control systems for backup and collaboration
Conclusion
Every skill, every technology has one charactersitic in common, that is to evolve constantly. The field of 3D sculpting continues to evolve day-by-day. Technology's always changing, so you've got to be willing to learn and adapt. It's part of what makes this field so exciting, though. There's always something new to discover!
With advancements in virtual reality and augmented reality, we can expect more intuitive and immersive sculpting experiences. Machine learning and AI in 3D are also likely to play a significant role in automating certain aspects of the sculpting process, allowing artists to focus more on creative decisions.
For those looking to enter the world of 3D sculpting, the future is bright. The demand for skilled 3D sculptors continues to grow across various industries. With dedication, practice, and a willingness to continuously learn and adapt to new technologies, aspiring sculptors can carve out successful careers in this exciting and dynamic field.
Remember, every master sculptor started as a beginner. Embrace the learning process, experiment with different techniques, and don't be afraid to push the boundaries of your creativity. The world of 3D sculpting is waiting for your unique vision and talent!


